
First I get the script (not shown here) and read though the whole thing twice. Doing this helps me to get an idea of where we're going with the story. It also gives me a chance to get a lot of the visuals rattling around in my head.
On the second read through I'll often make little notes to self and crude little stick figures in the margins to refer back to, in case I have a particularly inspired angle or pose, when I start thumbnails.
Now's time to finally put pencil to paper! Thumbnail sketches are tiny, tiny versions of the comic page drawn to give the editors an idea of where I plan to go with the art. Here's the thumbnail for Devil Slayer#1 page 15 shown a bit larger than actual size.
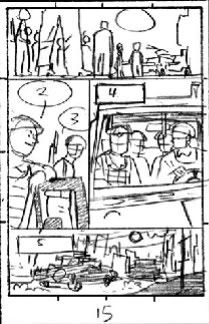
I try to do thumbnails for an entire issue (generally 22 pages) all on the same day to make sure we have a good flow from page to page.
After the thumbails are approved I rule out my panel borders and go straight to pencils.
I used to draw full size 11x17 "roughs" in marker that I would then trace on a lightbox. I ended up cutting out the rough stage altogether since at the end of the day it just ended up eating too much time. Not to mention the fact that by the time a page was completed from thumbnail to inks I had already drawn it FIVE times!
Here's the first draft of the pencils for page 15. Drawn first with a hard lead and tightened up (but not too much) with a mechanical pencil with a softer lead.
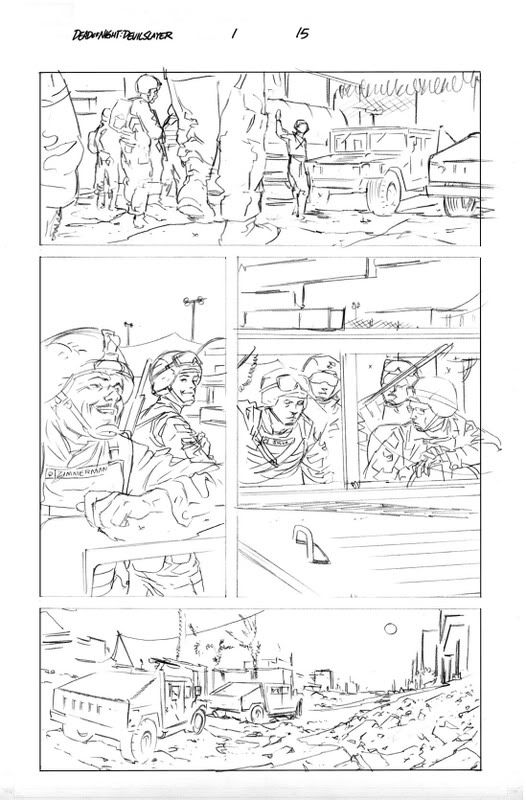
It was decided that the angle in panel 1 wasn't quite working. We needed to have a better look at the main character here, so he was brought up to the foreground in this version. Bit of a dutch angle too, since things are about to get weird. If you haven't picked up the issue I won't spoil it for ya:)
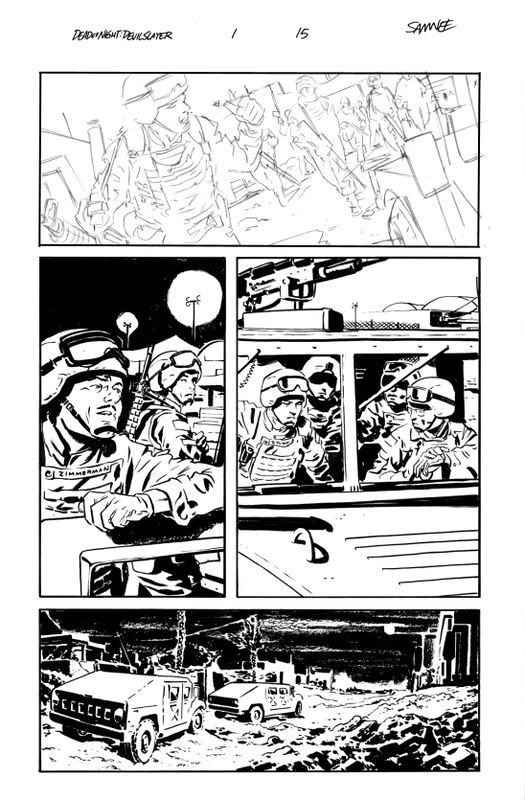 After the new version of panel one got the thumbs up I went ahead and finished off the inks for the page. The inks were done with a Raphael series 8404 size 4 brush, Pentel Color Brush, Faber Castell Pitt Pen sizes B and M for panel borders. Oh, and a few bits of grease pencil as well.
And here we have the finished page.
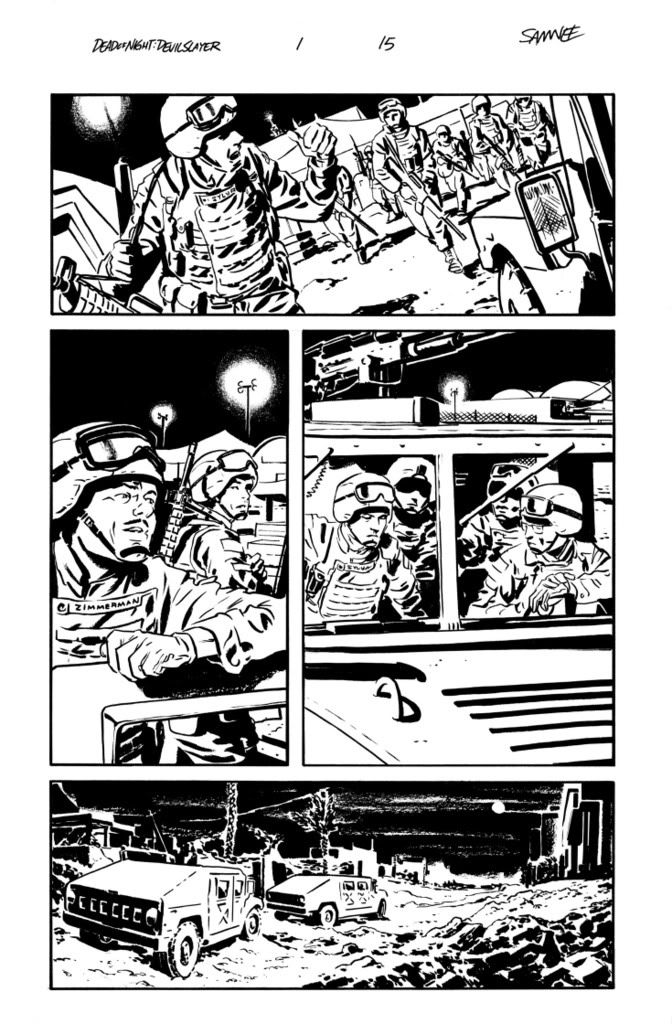
I ended up tweaking a few more things before this got uploaded to the Marvel FTP site, but this is pretty close to the file that was passed along to be colored and lettered.
Here's the first draft of the pencils for page 15. Drawn first with a hard lead and tightened up (but not too much) with a mechanical pencil with a softer lead.
It was decided that the angle in panel 1 wasn't quite working. We needed to have a better look at the main character here, so he was brought up to the foreground in this version. Bit of a dutch angle too, since things are about to get weird. If you haven't picked up the issue I won't spoil it for ya:)
After the new version of panel one got the thumbs up I went ahead and finished off the inks for the page. The inks were done with a Raphael series 8404 size 4 brush, Pentel Color Brush, Faber Castell Pitt Pen sizes B and M for panel borders. Oh, and a few bits of grease pencil as well. And here we have the finished page.
I ended up tweaking a few more things before this got uploaded to the Marvel FTP site, but this is pretty close to the file that was passed along to be colored and lettered.
4 comments:
Great post- love to see this sort of thing.
'Dutch' angle: spooky, I just heard this term for the first time yesterday, on a dvd commmentary.
Thanks for the sneak peek behind the curtain, so to speak.
Nice, Chris. I love the process. And to not have to go through a phase of gathering reference or anything...
I couldn't do a book if I didn't have reference, or at least a concept phase.
=s=
Alan:Sweet, does that make me sound smart then?:)
Pat: My pleasure. Glad ya dig it.
Shane:Thanks, but I definitely DO do research. On a book like this, which takes place in "real world" locations, a good deal of time was spent gathering reference materials on vehicles, locations, weaponry and the like. For this issue, and this page in particular, there was no digging around for stuff because it was all gathered before I started on issue #1 and had a good deal of ref left over from my past few books that took place in the middle east.
Post a Comment